Highlight, label, and collapse clades
Mark related leaves with a name, branch color, or shaded background. Collapse their clade into a wedge when you want to show less detail.
Open your tree or download the six-leaf example. The examples below use the clade containing C, D, E, and F. A clade consists of one ancestor and all its descendants.
| To show | Use |
|---|---|
| Colored branches for a group | Style clade → Branch color |
| A name for the group | Annotate clade… |
| A shaded area behind a group, with its branches still visible | Style clade → Clade underlay |
| A compact shape in place of the group's descendants | Collapse clade |
A wedge represents a collapsed clade. A hull is the outline of a clade's background in the Radial layout. Adding a hull does not collapse the clade.
Select the clade
- Click Rect above the tree to use the rectangular layout.
- Find the branch junction that joins the C–D pair to the E–F pair.
- Double-click that junction to select its internal node and open the Inspector.
- Check that Descendant leaves is 4 and Descendant terminal leaves lists C, D, E, F.
Check the descendant list before styling a clade on a larger tree. An internal node identifies its whole clade; a leaf's node identifies only that leaf.
If the junction is hard to find, select its ancestor from two leaves:
- Click C, then hold Ctrl on Windows or Linux, or Cmd on macOS, and click E to keep both selected.
- Right-click one of those selected leaves and choose Find MRCA of selection. MRCA means most recent common ancestor.
- Double-click the selected ancestor to inspect it. It includes D and F as well as the two leaves you selected.
To select every visible leaf within a clade, right-click its internal node and choose Select descendants. Hold Ctrl or Cmd while clicking individual leaves to add or remove them from a selection.
Add a clade label
- Right-click the internal node for C, D, E, F.
- Choose Annotate clade…, type
C–F group, and press Enter. Clicking elsewhere cancels the text edit. - Right-click the same node and choose Style clade.
- Under Clade annotation, choose the text color, use B for bold text, or adjust the size slider.
- Click Done.
Drag the annotation text to move it. Double-click it to edit its wording, or right-click it and choose Rename annotation…. Press Enter to save the edit.
Clade annotation formats the group name. Label color and Label style in the same style panel format the descendant leaf labels. Changing a clade annotation does not rename the leaves or alter their metadata matches.
Color the branches and leaf labels
- Right-click the clade's internal node and choose Style clade.
- Under Branch color, choose a color from the palette or enter a color
such as
#0284c7in the color field. - Adjust Line width, or choose a Line style such as Dashed.
- Under Label color, choose a color for the descendant leaf labels. Under Label style, use B, I, or the size slider.
- Click Done to close the panel and keep any color typed into a field.
The branch color applies throughout the clade and takes precedence over colors derived from its metadata.
To change one leaf instead, double-click its label or node and use the Inspector controls for Branch color, Label color, and Label size. To rename a leaf, right-click it, choose Rename leaf, type its new name, and press Enter. TreeViz keeps the original identifier for metadata matching, so the rename changes the displayed name while preserving its metadata in the session.
Add a background or hull
- Keep the C, D, E, F clade expanded.
- Right-click its internal node and choose Style clade.
- Under Clade underlay, choose a color, then click Done. A translucent background appears behind the clade's branches.
- Click Radial above the tree.
- Open Controls, expand Branches & nodes, and scroll to Collapsed wedges.
- Set Background to Hull to surround the clade with one outline. Choose Fitted for a background that follows its branches and wedges more closely.
The Background selector changes the shape of all radial clade backgrounds. Give each clade its own color with Clade underlay. These controls work even when no clades are collapsed.
In Rect, the underlay is a band behind the clade. In Circular, it is a sector. Hull and Fitted apply to Radial.
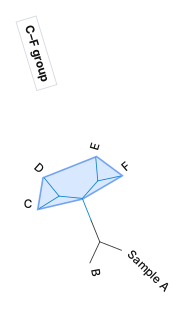
The hull surrounds C, D, E, and F while keeping their branches visible. Tracks and the legend are hidden here to show the branches.
Collapse a clade into a wedge
- Right-click the C, D, E, F internal node and choose Collapse clade. Collapse in its Inspector does the same.
- Check that a wedge replaces those four leaves and their branches. If you
added the
C–F groupannotation, the wedge uses that name. - Right-click the wedge and choose Style clade.
- Set Branch and wedge outline color for its outline and Wedge fill for its interior. Click Done.
- To restore the leaves, right-click the wedge and choose Expand clade, or use Expand in its Inspector.
Collapsing keeps the tree and metadata in the session. Tracks beside a wedge
summarize its leaves. For example, the tutorial's abundance bar shows the mean
of the available C–F values: (8 + 2 + 15) / 3, or about 8.33. F's missing value
is excluded. A color strip shows the most frequent category. Expand the clade
to inspect individual values again.
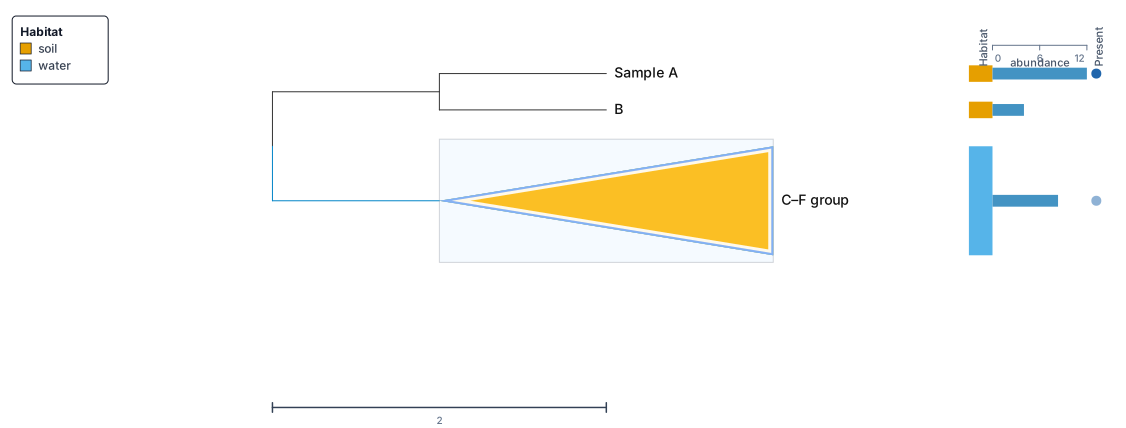
The yellow wedge replaces the C–F branches in this rectangular view. The metadata beside it summarizes the group.
Give expanded groups more space
Large collapsed clades can leave little room for expanded groups. In Rect or Circular, open Controls, expand Layout, and set Collapsed clade spacing to Compact.
Proportional, the default, reserves space for every leaf in a collapsed clade. Compact reserves space for at most 12 leaves per collapsed clade. A collapsed group of 1,000 leaves therefore occupies 12 display positions. The four-leaf tutorial clade keeps its four positions in either mode.
In Rect, compact wedges are short triangles. A dashed guide connects a shortened wedge to its original label and metadata position. Expand the clade to restore its leaves. Their counts, branch lengths, and metadata remain unchanged. In Circular, compact spacing uses automatic node angles. Any selected Node angles (degrees) attribute is retained and used again when you return to Proportional.
Adjust radial wedges
For a radial tree, open Controls → Branches & nodes → Collapsed wedges to adjust all wedges:
| Control | Use |
|---|---|
| Shape | Choose Rounded or Triangle. |
| Fill | Choose Background to use the clade underlay, Branch to use the branch color, or Attribute to read the color from a node attribute. |
| Gap (px) | Set the space kept between neighboring rounded wedges. |
| Min body (px) | Give narrow wedges a visible body. |
| Wedge labels | Choose At wedge tip or Leader lines to move labels away from crowded wedges. |
| Size by | Keep Tree shape to size wedges from the branches they replace. |
An individual Wedge fill overrides the shared Fill setting for that wedge. This Shape selector and the Gap (px) and Min body (px) controls appear in Radial. The Collapsed clade spacing selector above appears in Rect and Circular.
Remove styling or save the result
To remove a clade's custom colors, annotation, and other style settings, right-click its node or wedge and choose Reset clade style. The Reset all overrides control in Style clade does the same. It preserves whether the clade is collapsed or hidden.
Open Export and choose Export Session (JSON) to download a
.treeviz.json file with the tree, metadata, tracks, clade labels, backgrounds,
and collapsed state. Reopen that file in TreeViz to continue editing.
For a figure, reopen Export and choose Export SVG, Export PNG, or Export PDF. See Exports for image settings and format choices.