Your first annotated tree
Build a six-leaf tree with habitat colors, abundance bars, and presence dots. Change a leaf label, add a legend, and save a file that reopens for editing. It runs in a web browser and needs no installation.
1. Open the example tree
- Download first-tree.nwk.
- Open TreeViz.
- Click Add Tree, select
first-tree.nwk, and open it. Dragging the file onto the page also opens it. - Click Rect above the tree, then Fit.
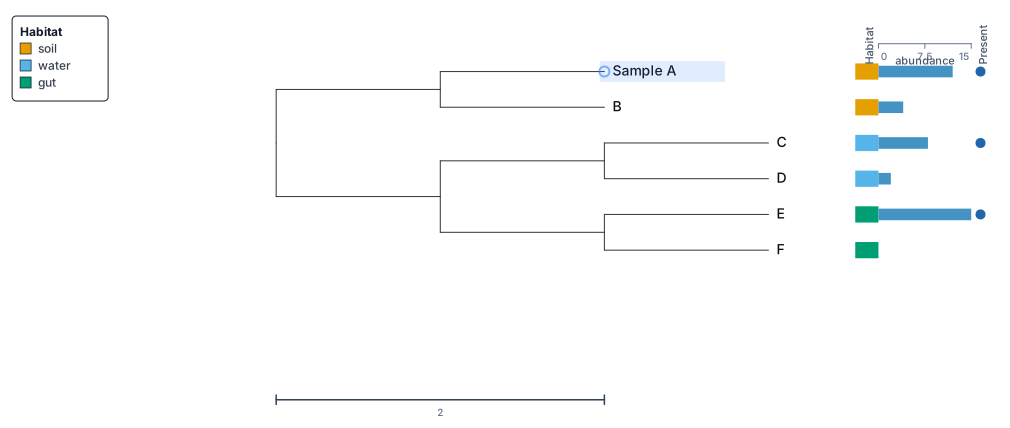
You should see six leaf labels: A, B, C, D, E, and F. A leaf, also called a tip, is an endpoint of the tree. An internal branch junction represents an ancestor.
The downloaded file contains this Newick text:
Parentheses group related leaves. The numbers after colons are branch lengths; the semicolon ends the tree. This synthetic example is for learning the controls.
2. Import the metadata table
Download metadata.csv. It contains:
leaf_id,habitat,abundance,abundance_day2,present,display_name
A,soil,12,15,yes,Sample A
B,soil,4,5,no,Sample B
C,water,8,7,yes,Sample C
D,water,2,3,no,Sample D
E,gut,15,18,yes,Sample E
F,gut,,6,no,Sample F
leaf_id connects each row to a leaf. habitat is a category; the two abundance
columns are numbers; present records yes or no. The empty abundance cell for
F means the value is missing. display_name holds an alternative name to inspect
later.
- Click Add Tree again and select
metadata.csv. This button also opens metadata files. Keep the tree loaded. - In the import review, set Row key column to leaf_id.
- Check Preview: it should show 6 exact, 0 unmatched leaves, and 0 unmatched rows.
- Leave Goal prompt empty and Apply suggested tracks on import unchecked. These optional suggestions are not needed for this tutorial.
- Click Import.
Importing the table attaches the values to the leaves. The next steps choose how to draw them. The equivalent tab-separated file contains the same data. Import either format once.
3. Color the leaves by habitat
- Click Tracks above the tree.
- Click + Add Track.
- Set Column to habitat (categorical).
- Set Kind to color-strip, then click Add.
- Expand the new track by clicking its title if its settings are closed.
- Set Title to
Habitat. Leave Visible checked and keep the default palette.
A and B share one color, C and D share a second, and E and F share a third. The strip sits beside the leaves; it does not recolor the branches.
4. Add abundance bars and presence dots
Repeat + Add Track for these two columns:
| Column | Kind | Title |
|---|---|---|
| abundance (continuous) | bar | Abundance |
| present (binary) | binary-dots | Present |
Expand each track to set its Title. For the bar track, enable Show axis. E should have the longest bar, followed by A, C, B, and D. F has no abundance value. Presence dots appear for A, C, and E.
Close Tracks if it covers the figure, then click Fit. Use the mouse wheel or trackpad to zoom, and drag empty space to pan. See Add metadata tracks for gradients, heatmaps, text tracks, and changing track widths.
5. Change a label
- Right-click the leaf label A and choose Rename leaf.
- Replace the text with
Sample A, then press Enter.
The displayed name changes. The metadata already bound to that leaf stays attached. Within this saved session, TreeViz retains the original imported identifier for matching.
To change text size, open Controls, expand Labels, and adjust the leaf label size. To change one label's color or size, double-click the leaf to open its Inspector. See Edit labels for group labels and crowded figures.
6. Put the legend in the figure
- Click Legend above the tree.
- Find the Habitat section.
- Click the star button beside that section. Its tooltip is Display in figure.
- Close the panel and drag the legend to an empty part of the figure.
The in-figure legend appears in image exports. The sidebar legend is a control panel and is not part of the exported image.
7. Save and reopen your work
- Click Export.
- Under Session, click Export Session (JSON). Keep the downloaded
.treeviz.jsonfile. - Open Export again and choose Export SVG or Export PNG for a figure.
- Open TreeViz in another tab, click Add Tree, and select the saved
.treeviz.jsonfile.
The reopened session should contain all six leaves, the Sample A label, the
metadata, three tracks, and the figure legend. The original tree and CSV do not
need to be imported again.
Browser autosave is useful for continuing on the same device and browser profile. The downloaded session is the copy to keep or move to another computer. Other visitors cannot see your browser's previous sessions. A Share link contains a copy of the session and can be opened by anyone given the complete link.
For the next task, highlight and collapse the C–F clade. That guide adds a group label, a shaded background, and a collapsed wedge.